At the end of the year I decided to change things up a bit with first grade and conduct an author study through a project based learning inspired format (CCSS RL.1.3, W.1.7). I had been working with first graders on science standards through most of the late winter and early Spring, and wanted to give them the opportunity to capitalize on some of the research and collaboration skills they had developed through the course of that study.
After looking at the resources available to us, I settled on Tomie dePaola for our author of choice. He is featured on our favorite database, PebbleGo, and we had a number of books by him that we would be able to choose from to compare and contrast.
I prepped the students by introducing them to the Super 3 research model using a YouTube video I found. The video is concise, visual and really helps even the youngest student understand what they need to do to complete a project.
The author study was essentially divided into two big parts: researching Tomie dePaola and his work, and creating projects to show what we know.
 Using Discovery Education's Board Builder, I collected a number of videos of Tomie dePaola's work, and during our book fair, in small groups, students watched those videos on our Smartboard. For this particular activity, students just needed to watch and enjoy - we had too many distractions to take notes on the story. The activity was enough though to give students an idea of some of dePaola's characters, and the kids for sure remembered Strega Nona.
 I let each of the classes choose which books by dePaola they wanted to read, and with a little encouragement, all of the classes chose to read Strega Nona, Her Story. Some other favorites that the kids picked were Big Anthony and the Magic Ring and Bill and Pete to the Rescue. For each story, students filled in a "First Grade Story Map" to keep track of characters, settings, major events and favorite parts. We did the first one together as a class, and then with each of the next stories, I gave students a little more ownership of completing the work themselves. You an check out the handout {here}.
After looking at the resources available to us, I settled on Tomie dePaola for our author of choice. He is featured on our favorite database, PebbleGo, and we had a number of books by him that we would be able to choose from to compare and contrast.
I prepped the students by introducing them to the Super 3 research model using a YouTube video I found. The video is concise, visual and really helps even the youngest student understand what they need to do to complete a project.
The author study was essentially divided into two big parts: researching Tomie dePaola and his work, and creating projects to show what we know.
Part I: Learning about Tomie dePaola
The Question
For our Project Based Learning experience, we started with this question: Who was Tomie dePaola and what were some of his major characters, settings and the problems and solutions in his stories?
Plan - Research
I explained to the kids that our plan was to learn about Tomie dePaola first, watch some recordings of his stories, then choose three books to read that were by Tomie dePaola. While we were reading, we would take notes on graphic organizers as part of the "Do" phase.
 |
| PebbleGo has some excellent selections for author biographies! |
Do - Research
We first turned to PebbleGo to learn about dePaola's life as a whole class. As part of their research, the kids used the notes sheet under "Activities" on PebbleGo and wrote down notes about why he was important and what he did.
 Using Discovery Education's Board Builder, I collected a number of videos of Tomie dePaola's work, and during our book fair, in small groups, students watched those videos on our Smartboard. For this particular activity, students just needed to watch and enjoy - we had too many distractions to take notes on the story. The activity was enough though to give students an idea of some of dePaola's characters, and the kids for sure remembered Strega Nona.
As a side note - if you've never used Board Builder, you can see a blog entry [here] with 50 ways to use it. Here's a great, quick video that walks you through the basics of how to use Board Builder by Pulaski S D Technology Integration:
Do: Reading the Stories & Taking Notes
 I let each of the classes choose which books by dePaola they wanted to read, and with a little encouragement, all of the classes chose to read Strega Nona, Her Story. Some other favorites that the kids picked were Big Anthony and the Magic Ring and Bill and Pete to the Rescue. For each story, students filled in a "First Grade Story Map" to keep track of characters, settings, major events and favorite parts. We did the first one together as a class, and then with each of the next stories, I gave students a little more ownership of completing the work themselves. You an check out the handout {here}.
Review: Notes & Ideas
After each story, I took a quick opportunity to help students review their work and notes and to make sure students were understanding the content and to help them "flesh out" their ideas more if they needed to. They were really excited about the stories and what they were learning as we went, and they couldn't wait to get to the project piece.
Part II - Makerspace Inspired Projects
Question
Our question, now that we were finished learning about Tomie dePaola and his work, shifted to: How can we share what we have learned about Tomie dePaola, his books, characters and settings with other people in our school.
I reminded the kids of our Plan, Do, Review process, and explained that there would be two parts to our "Planning" phase: we would need to brainstorm a list of project types, and then create a plan for making the project.
Plan- Brainstorming Projects
Using the Smartboard, I acted as a scribe for the class and let the kids call out different project types they could do. I asked them to think about to our "maker centers" before Winter Break, and asked them to look at the things we had around the room and in our makerspace area
 that would be good to use for a project. Each class came up with many different possibilities. Each of the classes realized they could use the Lego table to build the setting of Calabria, they saw the puppet theatre and realized they could make and record a puppet show of their favorite story, they saw the markers and crayons and identified that they could draw large murals and characters to hang.

The most original (and for me terrifying) project ideas kids came up with were to make stuffed animals and sculptures. It took everything I had not to totally nix those ideas. I really can't sew a button on a shirt, and my clay modeling skills are next to nothing. Instead of saying no, I asked them what they thought they would need to make those projects work...and to my surprise the kids had a do-able answer. They didn't even plan to sew anything, all they needed was some felt, stuffing and a glue gun, which I could totally handle. For the sculptures the kids asked for Model Magic - after some investigation and consultation with the art teacher, that seemed like a do-able material as well.
From our lists, each class chose 6 projects from the brainstormed list to work with, and then each student got to choose the project type that was most appealing to them. The only restrictions I put on them was for the lego table, I told them I couldn't let any more than 6 students work on the Lego table at once because it wasn't big enough, and the rule was they had to use the pictures from the books to build and not destroy other people's contributions. Each student found something to work on that they really had a sincere interest in doing.
Plan: Project Materials and Timeline to Finish
Each project group met together at a library table, and using the collaboration board created a list of materials they would need to complete the project, a goal for finishing the project, and in some cases a rough draft or sketch of what they needed to do. Once they had their plan written down, they sent a group spokesperson to me to approve their plans and give feedback if needed.
Do: Projects
Most classes had about three weeks to complete the projects. Groups worked together, when necessary I intervened to help them problem solve, but mostly I just got a chance to step back and watch them go. Some of the projects were more successful than others. The Lego setting of Calabria turned out great, and the kids developed some great art work. Some of groups did not quite have enough time to totally finish because we ran out of school days, but I could tell from listening to them work together that they really were understanding the characters in the stories.
Review: Time to Celebrate
On the last day of library for the year, I gave students 30 minutes to finish up their work, and then we took some time to share projects and debrief. The kids were amazed at what each of the groups had created and were really excited to share with each other.
Here are pictures of some of the projects. I think they turned out great - and the kids were extremely proud of their work:)
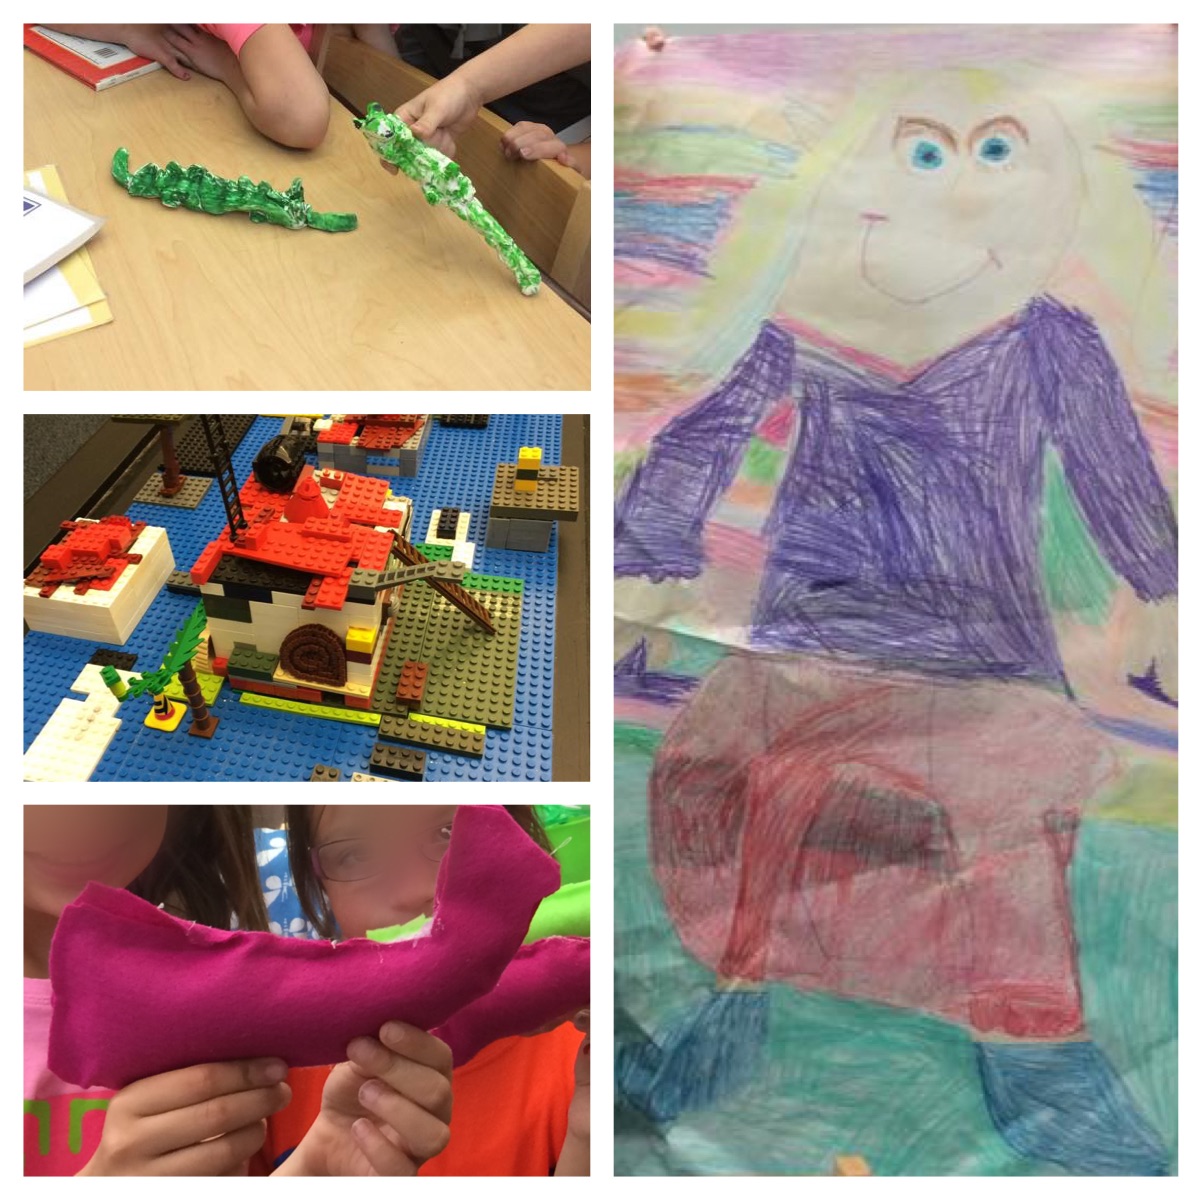 |
| I love these projects because they were entirely student driven and completed (minus some hot glue gun work from me) |
Comments
Post a Comment